Author: dwolven

  • Linux Cheat Sheet ‘ls’

    One of the most common commands in Linux is the ‘ls’ command. It dates back to 1961 and is used to “list” files and directories on a filesystem.

    To list files and directories:

    user@host:/etc/bind$ ls
    bind.keys  db.0  db.127  db.255  db.empty  db.local  externals  internals  named.conf  named.conf.default-zones  named.conf.local  named.conf.options  rev  rndc.key  zones.rfc1918
    

    To list file details (long):

    user@host:/etc/bind$ ls -l 
    total 56
    -rw-r--r-- 1 root root        1991 Apr 27  2021 bind.keys
    -rw-r--r-- 1 root root         237 Dec 17  2019 db.0
    -rw-r--r-- 1 root root         271 Dec 17  2019 db.127
    -rw-r--r-- 1 root root         237 Dec 17  2019 db.255
    -rw-r--r-- 1 root root         353 Dec 17  2019 db.empty
    -rw-r--r-- 1 root root         270 Dec 17  2019 db.local
    drwxr-sr-x 2 root bind        4096 Jan 25 14:26 externals
    drwxr-sr-x 2 root bind        4096 Jan 23 00:05 internals
    -rw-r--r-- 1 root bind         466 Jun 16  2021 named.conf
    -rw-r--r-- 1 root bind         498 Dec 17  2019 named.conf.default-zones
    -rw-r--r-- 1 root bind         752 Jan 24 23:36 named.conf.local
    -rw-r--r-- 1 root bind           0 Jan 24 23:34 named.conf.options
    drwxr-sr-x 2 root bind        4096 Jan  9 14:56 rev
    -rw-r----- 1 bind Debian-snmp  101 Jan 23 00:54 rndc.key
    -rw-r--r-- 1 root root        1244 Jan  8 21:39 zones.rfc1918
    List all files:

    user@host:/etc/bind$ ls -l 
    .  ..  bind.keys  db.0  db.127  db.255  db.empty  db.local  externals  internals  named.conf  named.conf.default-zones  named.conf.local  named.conf.options  rev  rndc.key  zones.rfc1918

    List all files with details:

    user@host:/etc/bind$ ls -al 
    total 64
    drwxr-sr-x   5 root bind        4096 Jan 25 22:10 .
    drwxr-xr-x 104 root root        4096 Jan 26 13:43 ..
    -rw-r--r--   1 root root        1991 Apr 27  2021 bind.keys
    -rw-r--r--   1 root root         237 Dec 17  2019 db.0
    -rw-r--r--   1 root root         271 Dec 17  2019 db.127
    -rw-r--r--   1 root root         237 Dec 17  2019 db.255
    -rw-r--r--   1 root root         353 Dec 17  2019 db.empty
    -rw-r--r--   1 root root         270 Dec 17  2019 db.local
    drwxr-sr-x   2 root bind        4096 Jan 25 14:26 externals
    drwxr-sr-x   2 root bind        4096 Jan 23 00:05 internals
    -rw-r--r--   1 root bind         466 Jun 16  2021 named.conf
    -rw-r--r--   1 root bind         498 Dec 17  2019 named.conf.default-zones
    -rw-r--r--   1 root bind         752 Jan 24 23:36 named.conf.local
    -rw-r--r--   1 root bind           0 Jan 24 23:34 named.conf.options
    drwxr-sr-x   2 root bind        4096 Jan  9 14:56 rev
    -rw-r-----   1 bind Debian-snmp  101 Jan 23 00:54 rndc.key
    -rw-r--r--   1 root root        1244 Jan  8 21:39 zones.rfc1918
  • Remote Packet Sniff with Mikrotik

    Remote TZSP packet capture.

    • Prerequisites.
      • Working Mikrotik connected to a port/resource you would like to sniff.
      • A Linux-like host to receive the stream.

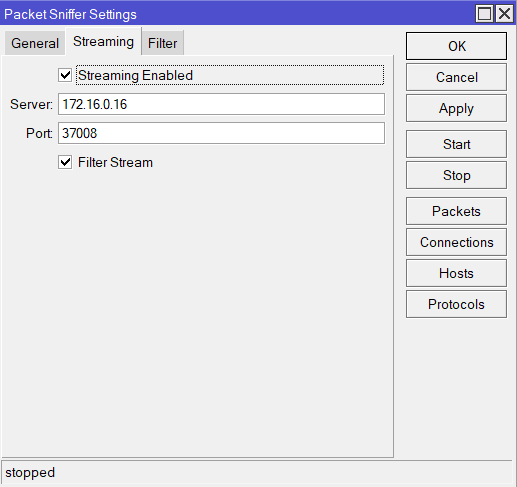
    Using Winbox (it makes it so easy eh?) go to Tools->Packet Sniffer. There add a server to receive a udp stream as well as a destination udp port. Odds are you will want to filter the stream (to restrict the type of traffic you’d like to stream).

    Tools -> Packet Sniffer -> Streaming

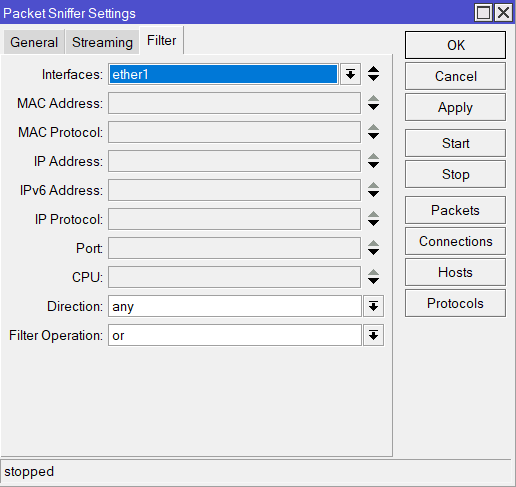
    Enter any filters here to make the pile of straw you’ll have to sift though latter just a bit smaller.

    Tools-> Packet Sniffer -> Filter

    On the target server with an account that has privileges’ on the specified port (usually anyone above 1024)

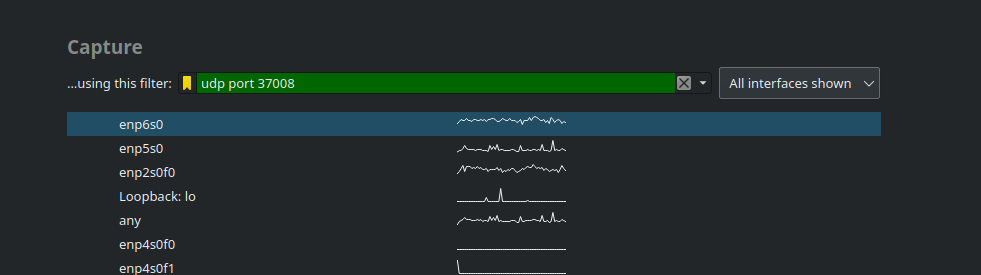
    tcpdump -i ens18 -tttt 'udp port 37008' -w capture.pcap

    To view in wireshark use a packet filter to properly handle the udp packets.

  • SQL: Greatest N per Group

    I run into this quite a bit. You have an auto incrementing row where you are interested in the last (most recent) entry made for a group of records.

    SELECT a.*
    FROM YourTable a
    LEFT OUTER JOIN YourTable b
        ON a.id = b.id AND a.rev < b.rev
    WHERE b.id IS NULL;

  • Building Influx on Ubuntu 20.04

    Editor’s note (2026): This is significantly out of date — InfluxDB is now on the 3.x line, the install method below (apt-key, the “bionic” repo) is deprecated and won’t work on modern Ubuntu, and InfluxDB 1.x is no longer the current major version. Check the current InfluxData install docs before following this. Leaving the original steps below for historical reference.

    Some quick notes on how to build Influx on Ubuntu. I’ve built a couple of instances of influx in the past for specific projects, usually without any other elements of the TICK stack.

    Update the system:

    sudo apt-get update
    sudo apt-get upgrade

    Get and install repository for Influx.

    curl -sL https://repos.influxdata.com/influxdb.key | sudo apt-key add -
    echo "deb https://repos.influxdata.com/ubuntu bionic stable" | sudo tee /etc/apt/sources.list.d/influxdb.list

    Update repository

    apt-get update

    Install Influxdb

    apt-get install influxdb

    Start up influx and enable it as a service

    systemctl start influxdb
    systemctl enable influxdb

    Check the status

    systemctl status influxdb

    Uncomment the following line in order to allow influx to listen.

    vim /etc/influxdb/influxdb.conf

    [http]
      # Determines whether HTTP endpoint is enabled.
      enabled = true

    Install the influx cli client

    sudo apt-get install influxdb-client

    Next in this series will be authentication and authorization.

  • Using Nginx to reverse proxy for microservices.

    It is a pretty common practice for ISP’s to give you a /29 (or charge you). If you have a bunch of microservices running you’ll quickly outlive the usefulness of the /29 and need a way to offer up those sweet, sweet services to people on the outside of your network.

    I covered setting up nginx with geoip2 module and associated geoip database in an earlier blog post. Follow those if you need a working example to get rolling.

    Conceptually the following is what we are shooting for.

    The first step is to make a few directories.

    mkdir /usr/local/nginx/conf/sites-available
    mkdir /usr/local/nginx/conf/sites-enabled

    Then to create a domain file in the sites-available directory.
    vi /usr/local/nginx/conf/sites-available/webmail

    server {
        listen 80;
        server_name webmail.domain.com;
        location / {
            proxy_pass http://192.168.0.25;
        }
    }

    Then link make this site available by soft linking it from the sites-available folder.

    cd /usr/local/nginx/conf/sites-enabled
    ln -s ../sites-available/webmail

    If you have followed the previous tutorials so far you’ll need to make sure that sites-enabled is being used by the nginx server by editing the main config. Include the “include” line like below in the http section:
    vi /usr/local/nginx/conf/nginx.conf

    http {
       access_log  /var/log/nginxaccess.log;
       include /usr/local/nginx/conf/sites-enabled/*;
       geoip2 /usr/share/GeoIP/GeoLite2-Country.mmdb {
           auto_reload 60m;
           $geoip2_metadata_country_build metadata build_epoch;
           $geoip2_data_country_code country iso_code;
           $geoip2_data_country_name country names en;
        }
       geoip2 /usr/share/GeoIP/GeoLite2-City.mmdb {
           auto_reload 60m;
           $geoip2_metadata_city_build metadata build_epoch;
           $geoip2_data_city_name city names en;
        }
       fastcgi_param COUNTRY_CODE $geoip2_data_country_code;
       fastcgi_param COUNTRY_NAME $geoip2_data_country_name;
       fastcgi_param CITY_NAME    $geoip2_data_city_name;
    
    }

    That is about it. Just continue to create the file in sites-available then soft link them in sites-enabled and reload nginx.

  • Nginx GeoIp2 configuration and blocking by country

    In a previous blog post I detailed the installation and build process for nginx with a geoip2 module. Here I’ll outline a simple setup that will allow blocking by country code for virtual host entries.

    Add the following to the nginx config. If you followed my previous tutorial it will be located at /usr/local/nginx/conf/nginx.conf.

    Add the following to the http profile:

    geoip2 /usr/share/GeoIP/GeoLite2-Country.mmdb {
        auto_reload 60m;
        $geoip2_metadata_country_build metadata build_epoch;
        $geoip2_data_country_code country iso_code;
        $geoip2_data_country_name country names en;
    }
    
    geoip2 /usr/share/GeoIP/GeoLite2-City.mmdb {
        auto_reload 60m;
        $geoip2_metadata_city_build metadata build_epoch;
        $geoip2_data_city_name city names en;
    }
    
    fastcgi_param COUNTRY_CODE $geoip2_data_country_code;
    fastcgi_param COUNTRY_NAME $geoip2_data_country_name;
    fastcgi_param CITY_NAME    $geoip2_data_city_name;
    
    map $geoip2_data_country_code $domain_xyz_allowed_country {
        default yes;
        BG no;
    }

    In a location then define what to do with that mapping:

    location / {
        if ($domain_xyz_allowed_country = no) {
            return 444;
        }
    }

    Or even:

    location / {
        if ($geoip2_data_country_code = BG) {
            return 301 https://google.bg$request_uri;
        }
    }

  • Nginx Geoip2 Setup on Ubuntu 20.04

    Editor’s note (2026): Ubuntu 20.04 reached end of standard support in April 2025. The steps below still work conceptually on 22.04/24.04, but grab whatever the current nginx stable release is from nginx.org/download rather than the pinned 1.21.4 referenced originally.

    There are lots of tutorials for setting up nginx for GeoIP using Maxmind’s database. The old .dat style database is being depreciated and being replaced with their new format — mmdb.

    This requires an updated build for nginx using the new GeoIp2 modules. This guide uses Ubuntu 20.04 server though could be adapted to whatever flavor of Debian you choose.

    Install the development tools necessary to

    sudo apt-get update
    sudo apt-get install build-essential

    Install the PPA for Maxmind’s libraries which are required to build nginx.

    sudo add-apt-repository ppa:maxmind/ppa
    apt update
    apt install libmaxminddb0 libmaxminddb-dev mmdb-bin geoipupdate 
    apt install libpcre3 libpcre3-dev zlib1g zlib1g-dev libssl-dev

    Visit https://www.maxmind.com/en/my_license_key to get an account and license key setup. This is how updates to the database are distributed. Enter the credentials /etc/GeoIp.conf configuration file:

    more /etc/GeoIP.conf
    
    # Replace YOUR_ACCOUNT_ID_HERE and YOUR_LICENSE_KEY_HERE with an active account
    # ID and license key combination associated with your MaxMind account. These
    # are available from https://www.maxmind.com/en/my_license_key.
    AccountID xXxXxX
    LicenseKey XxXxXXxXXXXXxxx
    

    Add an entry to update database weekly.

    59 3    * * 5   root    /usr/bin/geoipupdate >> /dev/null 2>&1

    Now would be a good time to do a geoip update:

    geoipupdate

    Get a current version of nginx. I like /usr/local/src for build location. Check nginx.org/download for whatever the current stable release is (this guide originally used 1.21.4; as of 2026 stable is in the 1.30.x line).

    cd /usr/local/src
    sudo wget https://nginx.org/download/nginx-1.30.0.tar.gz

    Get a current version of the nginx module with git and build

    git clone https://github.com/leev/ngx_http_geoip2_module
    cd ngx_http_geoip2_module/
    

    Now to build nginx with the geoip module.

    cd nginx-1.30.0
    ./configure  \
    --add-dynamic-module=../ngx_http_geoip2_module \
     $(nginx -V) --with-compat \
    --with-http_ssl_module
    
    make

    The following defaults will be used:

    
      nginx path prefix: "/usr/local/nginx"
      nginx binary file: "/usr/local/nginx/sbin/nginx"
      nginx modules path: "/usr/local/nginx/modules"
      nginx configuration prefix: "/usr/local/nginx/conf"
      nginx configuration file: "/usr/local/nginx/conf/nginx.conf"
      nginx pid file: "/usr/local/nginx/logs/nginx.pid"
      nginx error log file: "/usr/local/nginx/logs/error.log"
      nginx http access log file: "/usr/local/nginx/logs/access.log"
      nginx http client request body temporary files: "client_body_temp"
      nginx http proxy temporary files: "proxy_temp"
      nginx http fastcgi temporary files: "fastcgi_temp"
      nginx http uwsgi temporary files: "uwsgi_temp"
      nginx http scgi temporary files: "scgi_temp"

    If all goes will install it.

    make install

    Create systemd file to startup the service in /usr/lib/system/

    sudo vi /lib/systemd/system/nginx.service
    [Unit]
    Description=The NGINX HTTP and reverse proxy server
    After=syslog.target network-online.target remote-fs.target nss-lookup.target
    Wants=network-online.target
    
    [Service]
    Type=forking
    PIDFile=/var/run/nginx.pid
    ExecStartPre=/usr/local/nginx/sbin/nginx -t
    ExecStart=/usr/local/nginx/sbin/nginx
    ExecReload=/usr/local/nginx/sbin/nginx -s reload
    ExecStop=/bin/kill -s QUIT $MAINPID
    PrivateTmp=true
    
    [Install]
    WantedBy=multi-user.target

    Unmask the unit file with:

    sudo systemctl unmask nginx.service

    Add some paths to nginx and make run as user nobody. Add/edit the following lines in the /usr/local/nginx/conf/nginx.conf file:

    user  nobody;
    worker_processes  1;
    load_module modules/ngx_http_geoip2_module.so;
    
    error_log  /var/log/nginx/error.log;
    error_log  /var/log/nginx/error.log  notice;
    error_log  /var/log/nginx/error.log  info;
    pid        /var/run/nginx.pid;

    Take care of the permissions:

    groupadd nobody
    chown -R nobody.nobody /var/log/nginx
    touch /var/run/nginx.pid
    chown nobody.nobody /var/run/nginx.pid

    At this point you should be able to start the server:

    service nginx start

    That should get it up and running. You should now be able to use GeoIp2 once the configuration files are added. See my next post for setup information.