Blog

  • Slurping and decoding JSON in Perl

    Lately been doing a bit with JSON as a config file. It is a convenient way to store config variables.

    Procedural/Imperative style (untested, needs error handling, etc):

    #!/usr/bin/perl
    use strict;
    use Path::Tiny qw (path);
    use Data::Dumper;
    use JSON;
    
    my $file = "config/myfile.json";
    my $DATA = decode_json path($file)->slurp_utf8;

    OOP if it floats your boat (untested, needs error handling, etc):

    #!/usr/bin/perl
    use strict;
    use Path::Tiny qw (path);
    use JSON;
    use Data::Dumper;
    
    my $file = "./config/myfile.json";
    my $json = new JSON;
    my $data = Path::Tiny->new($file)->slurp;
    
    print Dumper $json->decode($data);
    print Dumper $data;
    
  • Cron Job for Let’s Encrypt nginx standalone renew Ubuntu

    I run nginx as a reverse proxy for sites that use SSL. Normally I’m doing something a bit strange so it doesn’t quite work having certbot manage my configs. This will renew ssl certs at 3am each morning if needed.

    0  3    * * 1   root    /usr/bin/certbot --standalone renew --pre-hook "systemctl stop nginx" --post-hook "systemctl start nginx" > /dev/null 2>&1
  • Getting GeoJson Multipolygon for political units

    Editor’s note (2026): The polygons.openstreetmap.fr tool referenced below has a long history of intermittent outages — if it’s down when you need it, Nominatim’s own export/lookup or the Overpass API are good fallbacks for pulling relation geometry.

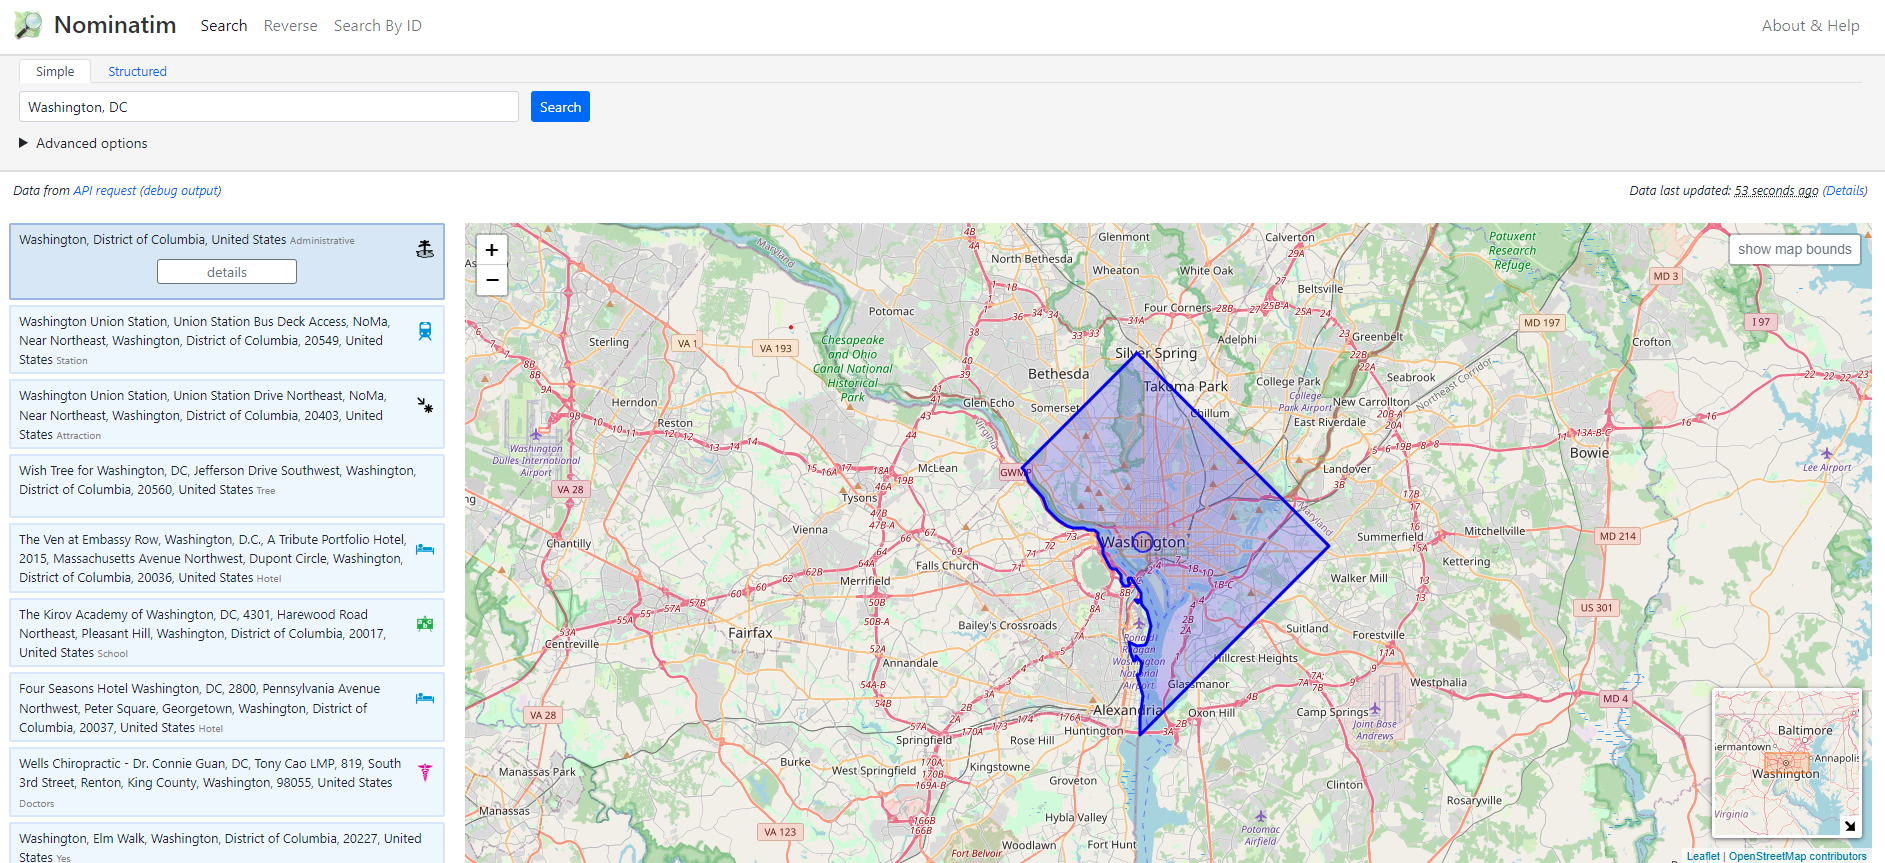
    Visit: https://nominatim.openstreetmap.org/ui/ and search for the location.

    Enter in the Location on the search bar

    Select the Details Button on the left for the entity you are interested in.

    Look for the value for the OSM relation id. In this case it is: 5396194.

    Visit the following URL: http://polygons.openstreetmap.fr/index.py and enter in the OSM relation id from above. You can use on eof the original geometries selected or generate a simplified version by setting the value of X to 0 and submitting. Then click on the geoJSON link.

    The geoJSON can then be imported into your database of choice such as:

    INSERT INTO table set gis = ST_GEOMFROMGEOJSON('{"type":"MultiPolygon","coordinates":[[[[-77.13,38.93],[-77.04,39.01],[-76.91,38.91],[-76.9,38.88],[-76.93,38.87],[-77.03,38.78],[-77.05,38.78],[-77.06,38.83],[-77.05,38.86],[-77.13,38.93]]]]}');
  • ext4 partition resize

    Editor’s note (2026): the original version of this post used `xfs_growfs`, which is for XFS filesystems, not ext4 — mismatched with the title. Corrected below: `resize2fs` is the ext4 equivalent.

    Never fails, I have to look it up every time. The sort though blogs, posts and generally bad information.

    For ext4:

    lvextend -l +100%FREE /dev/vg/lv_root
    resize2fs /dev/vg/lv_root
    

    For XFS, the equivalent is:

    lvextend -l +100%FREE /dev/vg/lv_root
    xfs_growfs /mount/point
    
  • Static Netplan template Ubuntu 20.04

    Editor’s note (2026): `gateway4` shown below is deprecated in current Netplan releases — it still works but throws a deprecation warning. The current-style syntax is a `routes:` block instead. Both are shown here.

    I like to leave a dhcp server up so that when I spin up a virtual machine to tinker with it’ll grab that IP and I’ll be on my marry way.

    If in the event that I want to later statically assign it (the ip) just use the following template and adjust.

    Older / still-working style (deprecated):

    network:
      ethernets:
        ens18:
          addresses:
          - 172.16.0.2/24
          nameservers:
            addresses:
            - 172.16.0.2
            - 8.8.8.8
            search:
            - domain.com
          gateway4: 172.16.0.1
      renderer: networkd
      version: 2

    Current-style syntax using a routes block instead of gateway4:

    network:
      ethernets:
        ens18:
          addresses:
          - 172.16.0.2/24
          nameservers:
            addresses:
            - 172.16.0.2
            - 8.8.8.8
            search:
            - domain.com
          routes:
          - to: default
            via: 172.16.0.1
      renderer: networkd
      version: 2

  • Linux Cheat Sheet ‘ls’

    One of the most common commands in Linux is the ‘ls’ command. It dates back to 1961 and is used to “list” files and directories on a filesystem.

    To list files and directories:

    user@host:/etc/bind$ ls
    bind.keys  db.0  db.127  db.255  db.empty  db.local  externals  internals  named.conf  named.conf.default-zones  named.conf.local  named.conf.options  rev  rndc.key  zones.rfc1918
    

    To list file details (long):

    user@host:/etc/bind$ ls -l 
    total 56
    -rw-r--r-- 1 root root        1991 Apr 27  2021 bind.keys
    -rw-r--r-- 1 root root         237 Dec 17  2019 db.0
    -rw-r--r-- 1 root root         271 Dec 17  2019 db.127
    -rw-r--r-- 1 root root         237 Dec 17  2019 db.255
    -rw-r--r-- 1 root root         353 Dec 17  2019 db.empty
    -rw-r--r-- 1 root root         270 Dec 17  2019 db.local
    drwxr-sr-x 2 root bind        4096 Jan 25 14:26 externals
    drwxr-sr-x 2 root bind        4096 Jan 23 00:05 internals
    -rw-r--r-- 1 root bind         466 Jun 16  2021 named.conf
    -rw-r--r-- 1 root bind         498 Dec 17  2019 named.conf.default-zones
    -rw-r--r-- 1 root bind         752 Jan 24 23:36 named.conf.local
    -rw-r--r-- 1 root bind           0 Jan 24 23:34 named.conf.options
    drwxr-sr-x 2 root bind        4096 Jan  9 14:56 rev
    -rw-r----- 1 bind Debian-snmp  101 Jan 23 00:54 rndc.key
    -rw-r--r-- 1 root root        1244 Jan  8 21:39 zones.rfc1918

    List all files:

    user@host:/etc/bind$ ls -l 
    .  ..  bind.keys  db.0  db.127  db.255  db.empty  db.local  externals  internals  named.conf  named.conf.default-zones  named.conf.local  named.conf.options  rev  rndc.key  zones.rfc1918

    List all files with details:

    user@host:/etc/bind$ ls -al 
    total 64
    drwxr-sr-x   5 root bind        4096 Jan 25 22:10 .
    drwxr-xr-x 104 root root        4096 Jan 26 13:43 ..
    -rw-r--r--   1 root root        1991 Apr 27  2021 bind.keys
    -rw-r--r--   1 root root         237 Dec 17  2019 db.0
    -rw-r--r--   1 root root         271 Dec 17  2019 db.127
    -rw-r--r--   1 root root         237 Dec 17  2019 db.255
    -rw-r--r--   1 root root         353 Dec 17  2019 db.empty
    -rw-r--r--   1 root root         270 Dec 17  2019 db.local
    drwxr-sr-x   2 root bind        4096 Jan 25 14:26 externals
    drwxr-sr-x   2 root bind        4096 Jan 23 00:05 internals
    -rw-r--r--   1 root bind         466 Jun 16  2021 named.conf
    -rw-r--r--   1 root bind         498 Dec 17  2019 named.conf.default-zones
    -rw-r--r--   1 root bind         752 Jan 24 23:36 named.conf.local
    -rw-r--r--   1 root bind           0 Jan 24 23:34 named.conf.options
    drwxr-sr-x   2 root bind        4096 Jan  9 14:56 rev
    -rw-r-----   1 bind Debian-snmp  101 Jan 23 00:54 rndc.key
    -rw-r--r--   1 root root        1244 Jan  8 21:39 zones.rfc1918
  • Remote Packet Sniff with Mikrotik

    Remote TZSP packet capture.

    • Prerequisites.
      • Working Mikrotik connected to a port/resource you would like to sniff.
      • A Linux-like host to receive the stream.

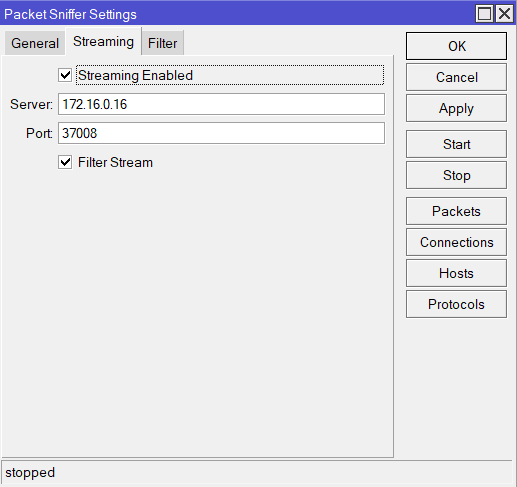
    Using Winbox (it makes it so easy eh?) go to Tools->Packet Sniffer. There add a server to receive a udp stream as well as a destination udp port. Odds are you will want to filter the stream (to restrict the type of traffic you’d like to stream).

    Tools -> Packet Sniffer -> Streaming

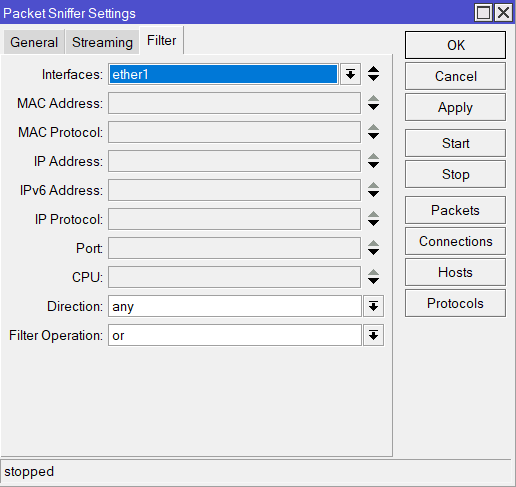
    Enter any filters here to make the pile of straw you’ll have to sift though latter just a bit smaller.

    Tools-> Packet Sniffer -> Filter

    On the target server with an account that has privileges’ on the specified port (usually anyone above 1024)

    tcpdump -i ens18 -tttt 'udp port 37008' -w capture.pcap

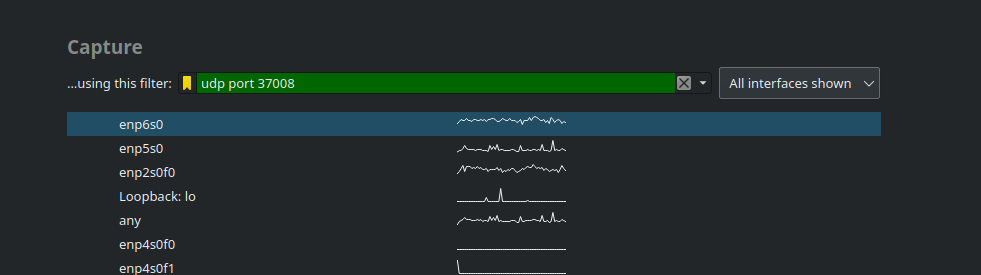
    To view in wireshark use a packet filter to properly handle the udp packets.

  • SQL: Greatest N per Group

    I run into this quite a bit. You have an auto incrementing row where you are interested in the last (most recent) entry made for a group of records.

    SELECT a.*
    FROM YourTable a
    LEFT OUTER JOIN YourTable b
        ON a.id = b.id AND a.rev < b.rev
    WHERE b.id IS NULL;

  • Building Influx on Ubuntu 20.04

    Editor’s note (2026): This is significantly out of date — InfluxDB is now on the 3.x line, the install method below (apt-key, the “bionic” repo) is deprecated and won’t work on modern Ubuntu, and InfluxDB 1.x is no longer the current major version. Check the current InfluxData install docs before following this. Leaving the original steps below for historical reference.

    Some quick notes on how to build Influx on Ubuntu. I’ve built a couple of instances of influx in the past for specific projects, usually without any other elements of the TICK stack.

    Update the system:

    sudo apt-get update
    sudo apt-get upgrade

    Get and install repository for Influx.

    curl -sL https://repos.influxdata.com/influxdb.key | sudo apt-key add -
    echo "deb https://repos.influxdata.com/ubuntu bionic stable" | sudo tee /etc/apt/sources.list.d/influxdb.list

    Update repository

    apt-get update

    Install Influxdb

    apt-get install influxdb

    Start up influx and enable it as a service

    systemctl start influxdb
    systemctl enable influxdb

    Check the status

    systemctl status influxdb

    Uncomment the following line in order to allow influx to listen.

    vim /etc/influxdb/influxdb.conf

    [http]
      # Determines whether HTTP endpoint is enabled.
      enabled = true

    Install the influx cli client

    sudo apt-get install influxdb-client

    Next in this series will be authentication and authorization.
  • Using Nginx to reverse proxy for microservices.

    It is a pretty common practice for ISP’s to give you a /29 (or charge you). If you have a bunch of microservices running you’ll quickly outlive the usefulness of the /29 and need a way to offer up those sweet, sweet services to people on the outside of your network.

    I covered setting up nginx with geoip2 module and associated geoip database in an earlier blog post. Follow those if you need a working example to get rolling.

    Conceptually the following is what we are shooting for.

    The first step is to make a few directories.

    mkdir /usr/local/nginx/conf/sites-available
    mkdir /usr/local/nginx/conf/sites-enabled

    Then to create a domain file in the sites-available directory.
    vi /usr/local/nginx/conf/sites-available/webmail

    server {
        listen 80;
        server_name webmail.domain.com;
        location / {
            proxy_pass http://192.168.0.25;
        }
    }

    Then link make this site available by soft linking it from the sites-available folder.

    cd /usr/local/nginx/conf/sites-enabled
    ln -s ../sites-available/webmail

    If you have followed the previous tutorials so far you’ll need to make sure that sites-enabled is being used by the nginx server by editing the main config. Include the “include” line like below in the http section:
    vi /usr/local/nginx/conf/nginx.conf

    http {
       access_log  /var/log/nginxaccess.log;
       include /usr/local/nginx/conf/sites-enabled/*;
       geoip2 /usr/share/GeoIP/GeoLite2-Country.mmdb {
           auto_reload 60m;
           $geoip2_metadata_country_build metadata build_epoch;
           $geoip2_data_country_code country iso_code;
           $geoip2_data_country_name country names en;
        }
       geoip2 /usr/share/GeoIP/GeoLite2-City.mmdb {
           auto_reload 60m;
           $geoip2_metadata_city_build metadata build_epoch;
           $geoip2_data_city_name city names en;
        }
       fastcgi_param COUNTRY_CODE $geoip2_data_country_code;
       fastcgi_param COUNTRY_NAME $geoip2_data_country_name;
       fastcgi_param CITY_NAME    $geoip2_data_city_name;
    
    }

    That is about it. Just continue to create the file in sites-available then soft link them in sites-enabled and reload nginx.